A hatchling slider fits in your palm. The adult needs a bathtub.
That gap between the turtle on the shelf and the turtle it becomes explains why aquatic turtles are among the most surrendered reptiles in the United States. Since 1975, the FDA has banned the sale of turtles with shells under 4 inches, a rule aimed at the salmonella risk that came with small children handling hatchlings like toys. The ban never stopped the real pipeline: baby red-eared sliders sold alongside starter kits that include a plastic tub, a palm-sized island, and a filter rated for a goldfish bowl. Six months later the turtle has doubled in shell length, the kit lives in a closet, and someone is searching for a pond that will take an animal they can no longer house. We would rather you start from the adult numbers, because every other decision in the build — tank, filter, dock, bulbs — flows out of that one. Get the volume right on day one and the rest of the setup gets cheaper and quieter. Get it wrong and you will rebuy the entire habitat within a year. This guide walks through the build in the order we would actually do it, with the temperatures, volumes, and replacement schedules that pet stores tend to leave off the receipt.Step 1: Buy for the adult shell, not the hatchling
The working rule most keepers and rescue groups use is simple: 10 gallons of water per inch of adult shell length. A female red-eared slider commonly reaches 10 to 12 inches, which puts her adult home at 100 to 120 gallons of water. Malls and swap meets mostly sell females, so plan for the big one even if you cannot sex a hatchling yet. Males top out nearer 8 to 9 inches. Painted and map turtles run smaller — a male painted turtle may stay under 6 inches — so the rule gives you a 60 to 80 gallon build instead. Two turtles means adding the second turtle's full volume, not half of it. Waste load scales with the animals, and under-filtered shared tanks turn cloudy within days. The math lands on a 120 gallon tank measuring roughly 48 by 24 by 24 inches for a single adult female slider. That sounds extreme next to the 20 gallon kit on the shelf, but the arithmetic is not an opinion — it is the shell measurement of the animal you already decided to keep. According to the AVMA, many aquatic turtles live for decades in captivity, which makes them a longer commitment than most dogs. Paying once for a real tank is the cheapest version of that commitment.Step 2: Choose the tank glass before you choose anything else
Two material choices dominate the market: standard glass aquariums and lighter composite or acrylic enclosures. For a fully aquatic turtle we recommend a standard glass aquarium with a reinforced rim, because water pressure over years is exactly what cheaper seams fail against. A 120 gallon glass tank is heavy — well past 200 pounds empty, well past a ton filled — so the stand and the floor underneath it need a real conversation before the tank arrives. Water weighs about 8.3 pounds per gallon; a filled 120 gallon build with substrate, hardscape, and the turtle clears 1,100 pounds on a footprint of eight square feet. Breeder-style tanks with lower front panels exist and make maintenance easier, but they are optional. What is not optional is a secure top. Turtles climb, and an adult slider can push a loose screen off its track. Plan the basking area and the lid together so the light fixtures can hang or mount without the turtle reaching them. One category we would steer beginners away from as a primary home: compact plastic kits like the small turtle tank with filter for baby turtles class of products. As a temporary hatchling tub or a quarantine bin they have a place. As a forever home they fail the 10 gallon rule for any turtle beyond about 2 inches of shell, and the built-in filtration is sized for fish, not for an animal that produces solid waste like a small waterfowl. We would rather see someone spend that money on a used 75 gallon tank and a secondhand canister filter.Step 3: Fill it deep, then filter like the water is twice as dirty as it looks
Depth matters more than most new keepers expect. Adult sliders are strong swimmers, and deep water gives them exercise, steadier temperatures, and far more dilution of their own waste. For adults, fill the tank nearly to the top and build the basking area above the waterline. The one safety rule: hatchlings need water shallow enough that a flipped turtle can right itself — roughly twice the shell's width until they grow some mass. Filtration is where turtle builds live or die. A turtle processes protein-heavy food and produces waste at a rate that embarrasses any aquarium fish, and the honest multiplier most experienced keepers use is a filter rated for two to three times the actual water volume. A 100 gallon turtle tank wants filtration marketed for a 200 to 300 gallon fish tank. Canister filters earn their price here; hang-on-back units stall out against turtle waste in weeks. Position the intake away from the basking dock debris zone and the outflow to create a current the turtle can swim against, which most sliders visibly enjoy. Then verify with a test kit instead of trusting the filter's rating. Ammonia and nitrite should read zero; nitrate stays manageable with 25 to 50 percent water changes weekly. Turtles drink the water they swim in, and chronic ammonia exposure shows up as eye problems and shell issues long before the water looks dirty. Dechlorinate every refill, because chlorine does not just bother the turtle — it also nukes the beneficial bacteria your biological filtration depends on. A maintenance calendar makes the water work boring instead of reactive. Weekly: test ammonia and nitrate, siphon the debris zone under the dock, and change 25 to 50 percent of the water. Monthly: rinse the canister's mechanical media in drained tank water, never tap water, or you will kill the bacterial colony you paid for. Quarterly: strip and scrub the dock, check the heater guard for cracks, and re-measure the basking surface temperature because bulbs drift as they age. None of these tasks takes more than 20 minutes in a well-built tank, which is exactly the point — good builds are lazy to maintain and bad builds are a second job.Step 4: Build a basking area the adult can actually use
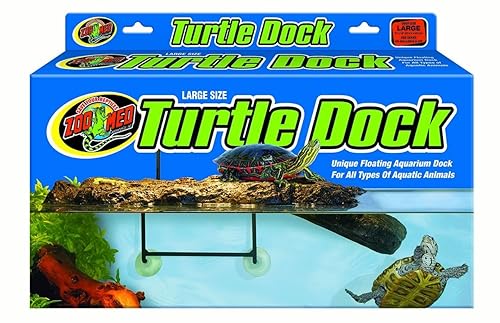
The basking area is the part of the build where starter kits fail hardest, and it deserves its own budget line. The requirements read short but rule out most cheap add-ons: the platform must be fully dry, large enough for the turtle's entire body to leave the water, stable under an adult's weight, and reachable by a ramp or stepped design from deep water. A slider that can only haul half its body out never fully dries, and incomplete drying feeds shell rot and skin infections. Two designs cover most home builds. Floating docks ride the water level up and down, which matters more than it sounds — you will be doing large weekly water changes, and a fixed platform that was perfect at full water becomes an island in the air after a half drain. The Zoo Med Turtle Dock is the classic floating option, a buoyant foam platform that self-adjusts with the waterline and comes in sizes matched to turtle weight. For heavier animals or bigger tanks, the Penn-Plax Reptology Aquatic Turtle Pier adds a larger platform with support pillars and an adjustable height ramp, which handles the weight of an adult female slider without flexing. Whichever design you pick, check the manufacturer's stated weight rating against the adult size of your species, not the hatchling you brought home. Docks sold for babies routinely advertise ratings around a few hundred grams — an adult female slider is a different order of magnitude.
Measure the platform surface with an infrared thermometer at shell height. You are aiming for roughly 90 to 95 degrees Fahrenheit on the basking surface under the heat lamp, with the water itself at 74 to 78 degrees for adult sliders and a degree or two warmer for hatchlings. The whole point of the dock is that the turtle can move between a hot dry surface and warm water and thermoregulate all day. If the surface runs hot, raise the lamp; sliders will avoid a dock that scorches, and then blame the dock.
Step 5: Heat and UVB, on a replacement schedule
Two fixtures go over the dock, and they are not interchangeable. The heat lamp creates the temperature gradient. The UVB lamp enables vitamin D3 synthesis, and without it the turtle cannot metabolize the calcium in its diet — the road from there leads to metabolic bone disease, soft shells, and deformities that no supplement added later can reverse. Our UVB lighting guide covers the failure modes in depth; for a turtle build the short version is that a T5 HO tube spanning about two thirds of the tank, mounted at the distance the manufacturer specifies above the dock (typically 10 to 12 inches for a 10 to 12 percent output tube with a mesh top in place), is the dependable configuration. Screw-in compact coils degrade fast and patchy; we do not recommend them as a primary UVB source for a basking species. The detail owners miss most often: UVB output dies long before the light does. The bulb keeps glowing for years while emitting almost nothing your turtle can use. Write the install date on the bulb housing with a marker and replace UVB tubes every 12 months. Screen tops matter here too — standard metal mesh screens block a large share of UVB, so position the tube under the open area or use a screen product rated for UVB transmission. On temperature stability: a submersible aquarium heater with a protective guard keeps the water in range, and turtles absolutely will bash an unguarded glass heater against the tank until it cracks. Pair it with a separate thermostat so a stuck relay cannot cook the tank overnight. The Inkbird ITC-308 temperature controller is the widely used, inexpensive way to put a hard cutoff between the heater and the outlet, and it doubles for the lighting circuit in warmer rooms where summer heat becomes the problem. Keep one thermometer in the water and one aimed at the dock; guessing is how a tank drifts ten degrees without anyone noticing.Step 6: Feed outside the tank, and the filtration problem shrinks
Turtles eat in water and swallow only underwater, which means every feeding dumps protein slurry directly into your carefully filtered tank. The single habit that most improves water quality is a dedicated feeding tub — a cheap plastic bin with dechlorinated water at feeding temperature, where the turtle eats for 15 to 20 minutes before returning home. The waste stays in the bin, and you dump it down the drain instead of filtering it for a week. Diet itself shifts with age. Juveniles trend carnivorous and grow fast on a pellet staple; adults do better with most of their intake as dark leafy greens and aquatic plants, with pellets and protein a few times a week. Floating greens that the turtle can graze through the day beat hand-feeding for adult sliders. Cut anything from the kitchen that carries butter, salt, or seasoning, and skip the ground beef — the fat profile is wrong in ways that show up as organ trouble in middle-aged turtles. One adjustment per species: musk and mud turtles stay small — often 4 to 5 inches — so the whole build scales down to a 40 to 60 gallon tank with shallower water and more bottom-walking space. Sideneck species run between the extremes. If your turtle is not a slider, look up the adult shell length first and run the 10 gallon rule from there; the dock, filter, and bulb choices in this guide carry over unchanged.Five mistakes we see in nearly every failed turtle setup
- Sizing the tank for the hatchling on the receipt instead of the adult shell the animal will have within three years — the mistake everything else compounds.
- Running a filter rated for the tank's fish capacity rather than two to three times the volume, then treating cloudy water with chemicals instead of upgrading.
- A basking platform rated for babies holding a six-inch turtle, or a fixed dock that sits an inch above the waterline after every big change.
- A UVB bulb three years old because it still lights up, or a compact coil bulb mounted twice the recommended distance.
- An unguarded heater and no thermostat, which is how an otherwise healthy tank produces a burned turtle or a cracked heater during a cold snap.
The practical takeaway
A proper aquatic turtle setup is front-loaded: the tank, the canister filter, the dock, and the two fixtures are the whole expensive part, and after that the recurring costs are food, bulbs on a calendar, and dechlorinator. According to the ASPCA, aquatic turtles need both a clean swimming area and a completely dry basking area, plus UVB exposure and appropriate heat — the checklist above is just those requirements turned into numbers you can buy against. If the adult-size math changes your mind about keeping a slider, that is a good outcome, not a failure — rehoming a hatchling is easy and rehoming a 12 inch adult is heartbreaking. But if you build to the numbers, you get an animal that swims hard, basks visibly, greets you at the glass for decades, and never needs an emergency upgrade you cannot afford. That is the deal the pet store shelf never mentions, and it is the only version of this hobby that stays cheap.Related Reading
Want more on this topic? Check out our guides on best reptile thermostats and temp control, best bearded dragon food diet, best reptile basking platforms turtle docks climbing ramps.